
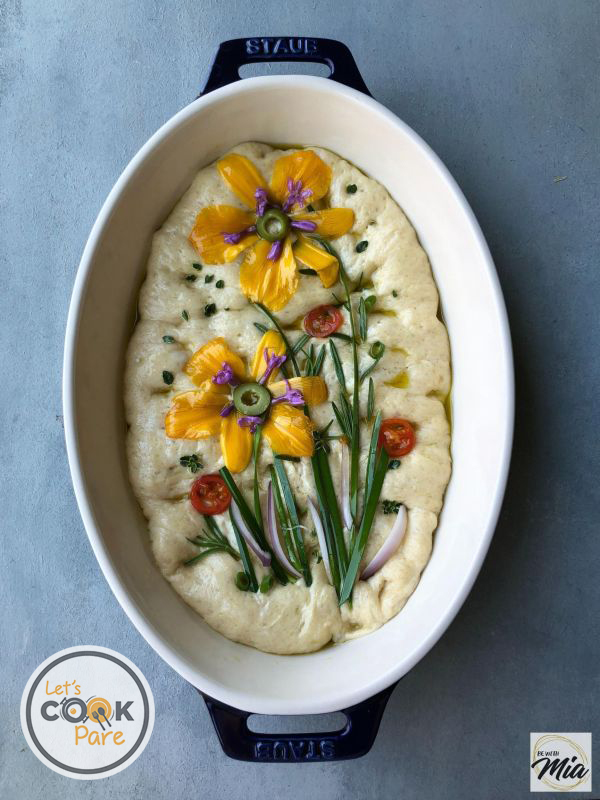
This summer focaccia Ligurian style recipe is adapted from Samin Nosrat’s Ligurian Focaccia with decorating tips from Terri Culletto, the original Van Dough Focaccia Art. The salty brine is the extra touch of the Ligurian Focaccia that echoes the coastal region where it’s from. It is sea salty. This focaccia is topped with beautiful herbs and vegetables that make this recipe a delicious and beautiful work of edible art. It is truly Focaccia Ligurian Style that just reminds me of summer.
I do not own a stand mixer and so I am always not the lookout for recipes that does not require a lot of hand kneading. This is a gateway for bread making for the newbie. Impressive but easy. It takes a little effort – only time.
You will need 16-24 hours (dependent on your room temperature). Most of it is waiting time for slow fermentation of the dough. In essence, this replaces kneading. Scant hands-on time will be on the decorating procedure.
Before making your first Summer Focaccia Ligurian Style, please read through the rest for helpful tips.
SALT
If you do not with the salt, you will end up having a very salty focaccia. Which is edible but maybe best to just use it as croutons. Do not make the same mistake that I did of not weighing the salt or using the right salt as indicated in the original recipe. I used Morton’s Coarse Kosher Salt in this recipe.
My mistake the first time I made this was using Morton’s Kosher salt when the recipe asked for Diamond Kosher salt where by volume is more but less dense. Morton’s is more packed (and fine sea salt will be denser), so I ended up doubling the actual amount of salt required. When I weighed the salt, 18 g is equivalent to a tbsp of Morton’s Coarse Kosher salt.
I cannot stress this more. Weigh your salt.
TEMPERATURE FOR FERMENTATION
Most homes in the US have controlled room temperatures. Most homes in the Philippines are relatively warmer. I have seen countless newbie bakers using recipes from people with controlled room temperatures. So when the recipe says to leave at room temperature overnight, the fermentation goes awry – yeast has gone more than doubled.
Here are some recommended timings based on your time preference and room temperature.
12-14 hours fermentation if room is between 70-75 F or 21-23 C
6-8 hours if room is warmer than 23 C
18-24 hours if in the fridge + 2-4 hours to bring it to room temp
Visual Key is that the dough doubles in size. Times are approximation.
HAVE A SKETCH OF YOUR DOUGH
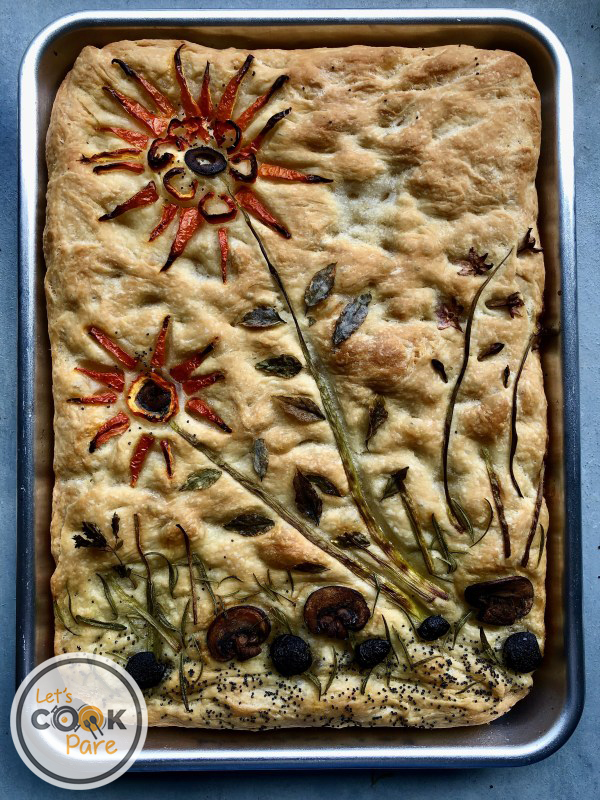
It does not have to be complicated. Something simple especially if it’s your first time to do it. The decoration of your Ligurian Style Focaccia will clearly scream summer. Unless of course you decide on a different season which I think is a great idea for different seasons and holidays.
DECORATING OPTIONS ACCORDING TO AFTER-COOK COLOR
While leafy herbs and edible flowers look pretty before the bake, most will turn brown and crisp after the bake. With that in mind, design accordingly. Terri recommends that dipping it in lemon water will keep the herbs color.
Optional Lemon Water Dip for herbs
Brown/Black
Most leafy herbs turn brown
Garlic Slices
Mushrooms
Grated Hard Cheese like Parmesan, Asiago, etc.
Black Olives
Black Sesame Seeds
Poppy seeds
Green
Castelvetrano or Green Olives
Green bell pepper
Capers
Asparagus
Red, Yellow and Orange
Tomatoes
Red Bell Peppers
Carrots
Pink/ Purple
Purple Sweet Tomatoes
Radish skin retains turns Pink/Purple
Red Onions keep the Purple color with a tinge of brown caramelization
Purple Carrots
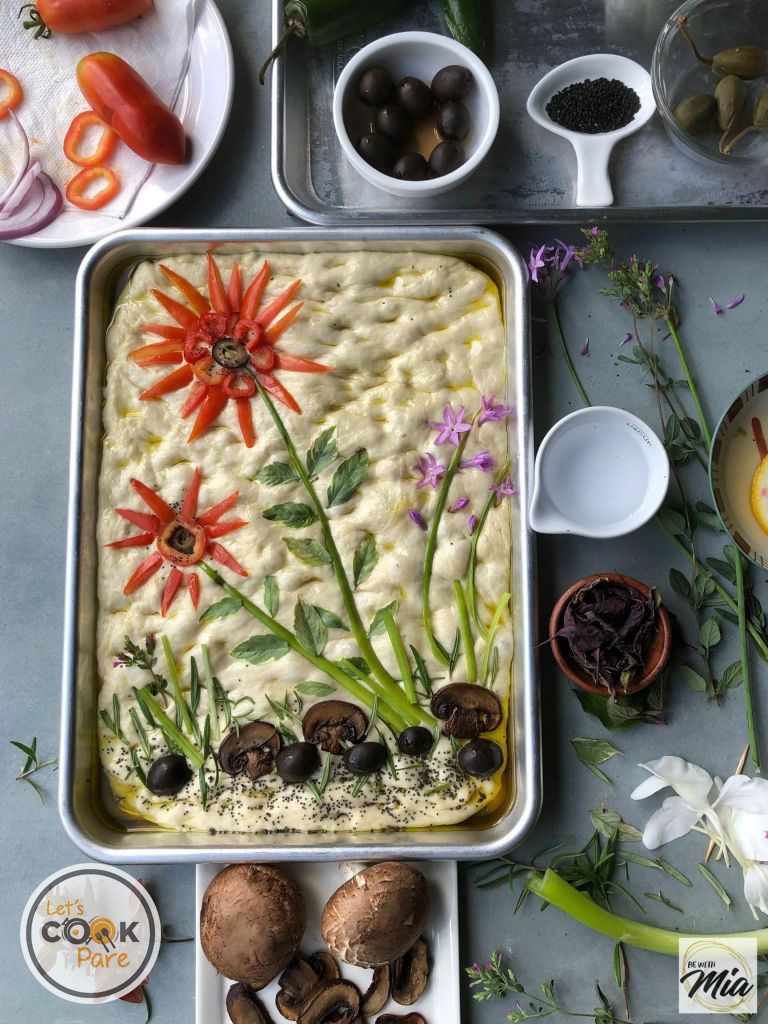
ON PREPPING VEGETABLES
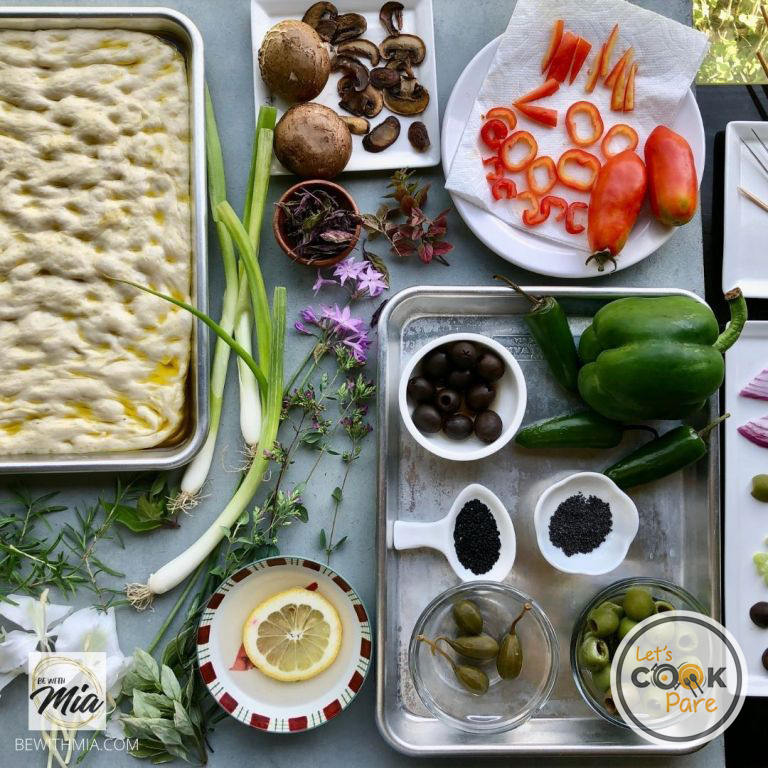
Cut
The way you cut the vegetables will also bring multiple options. For example, if you cut a mini bell pepper crosswise, you can have an almost roundish petal. On the other hand, when you cut the bell peppers lengthwise in a long triangular way, you can have petals similar to that of sunflowers etc.
Other prep
Remove seeds from tomatoes and lay on paper towel for excess moisture to be absorbed.
Mushrooms should be sautéed lightly because it holds a lot of moisture.
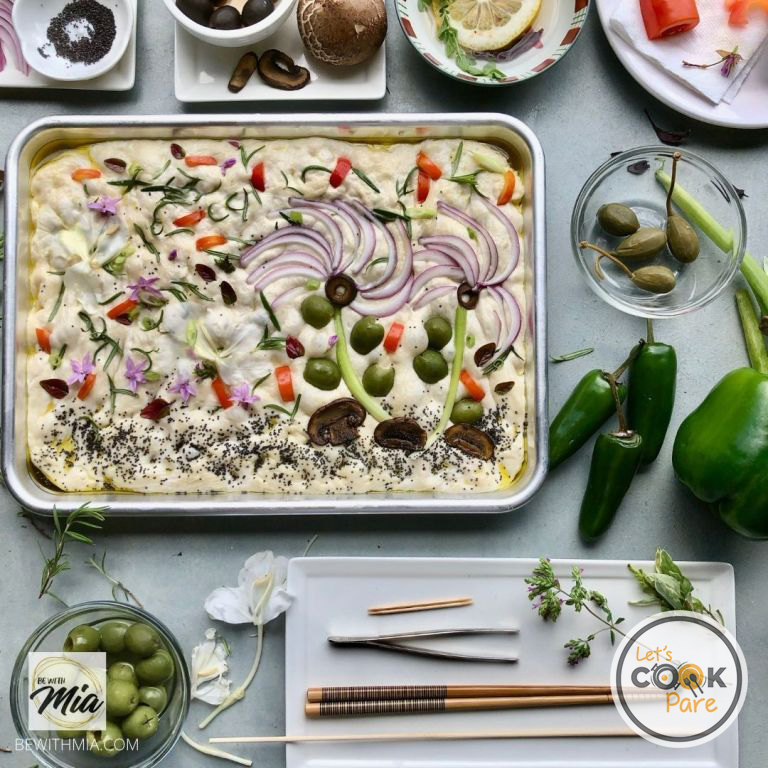
DECORATING SUGGESTIONS
Here are other suggestions on how you can cut and use herbs and vegetables for decoration.
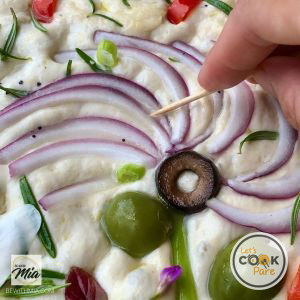
Black Olives can be flower centers. You can also add poppy seeds or sesame seeds for extra dimension.
Petals can be tomatoes or bell peppers.
Asparagus, chives or spring onions can be stems.
Herbs can be leaves.
I cut chives to make it look like tall grass.
Green olives can be like turtle shells or bugs.
Yellows tomatoes and bell peppers can also be butterflies tomatoes can (cherries, or, bell peppers)
Ideas are endless.
It is very important to note that you should press the decorations down or else it will pop out during the bake. A window to do this mid-bake is when you lower the temperature to 375F. Tuck it fast.
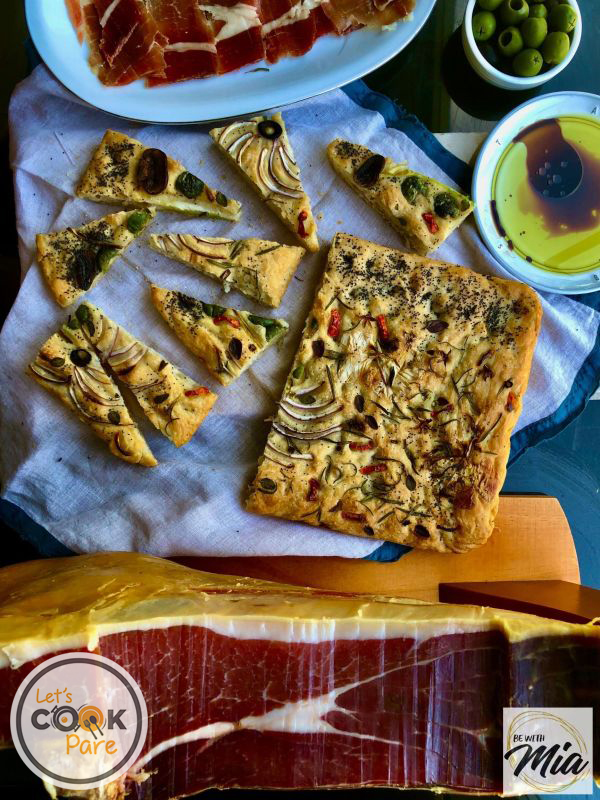
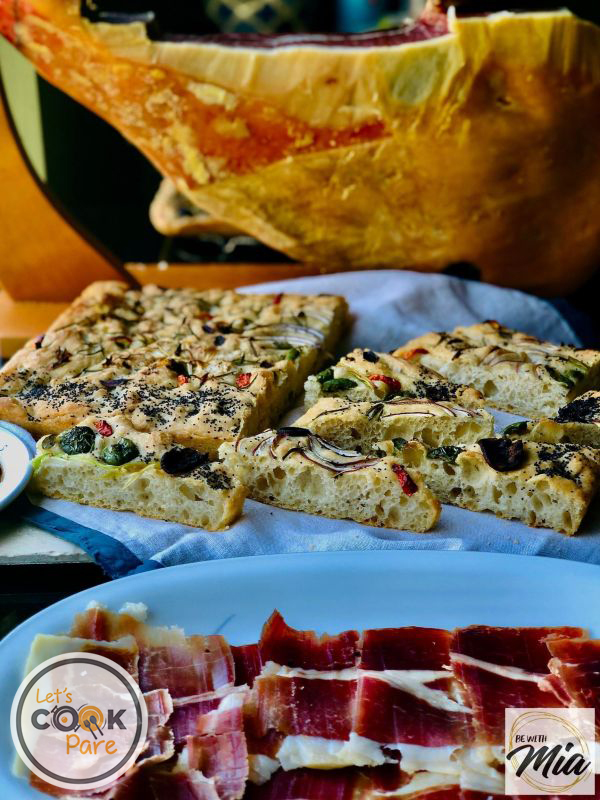
SERVING
This is meant to serve on the day of the bake. I like it with cured ham, olives and a dip of balsamic vinegar, olive oil, parmesan cheese and freshly ground pepper.

STORAGE
Wrap in plastic and freezer paper then in a ziplock. Freeze.
REHEATING
Drape a damp paper towel to defrost in the microwave. This prevents it from drying out while being nuked. Then toast if you wish.
SUGGESTED TIMELINE
This is the schedule I usually use when making focaccia.
Afternoon or Late Evening
Prep the dough. Cover. Leave on the kitchen counter
Create a sketch or visualize your art on the bread.
Next morning
1. Prep Decoration: Refer to your sketch.
2. Tip the fermented double-sized dough onto oil coated sheet pans. Stretch onto pans but don’t force it. Do 15 minute intervals while stretching for 30 minutes, so 3 stretches in total. Prep the veggies.
3. Final Proofing while decorating
4. On the final 30 minutes, preheat the oven with the upside down pan or pizza stone in upper mid rack.
So, there. I hope this lengthy post helps you to be less intimidated on how to create your own bread of art.
Use #BeWithMia if you replicated recipe or the post inspired you. MIA
Summer Focaccia Ligurian Style
Equipment
- 2 Mixing Bowls
- Rubber Spatula
- (2) 9 x 13 inch rimmed baking sheet pans OR or ceramic / glass baking dishes OR (1) 18 x 13 inch rimmed baking sheet pan
- Pizza stone or extra sheet pan (to keep the bottom of the focaccia crispy)
- For decorating: Chopsticks, Toothpick, BBQ stick or skewer clean tweezers
- Kitchen towels, wet and dry
Ingredients
Focaccia dough
- 2 1/2 cups lukewarm water
- 1/2 tsp active dry yeast
- 2 1/2 tsp honey
- 800 g All purpose unbleached flour 5 1/3 cups
- 18 g Morton's Kosher Coarse Salt measures a scant of 1 tbsp 3/4 tbsp if using fine seasalt
- 1/4 cup olive oil
Extra Olive Oil
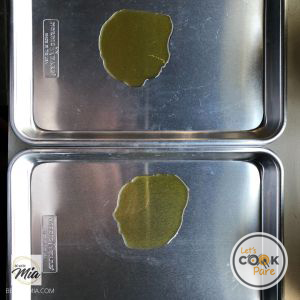
- 2 tbsp olive oil to coat the dough before the ferment divided
- 2 tbsp olive oil to coat the sheet pan additional if using parchment paper
- 2 tbsp olive oil to brush AFTER the bake
Decorative Herbs and Vegetables (see blog for a wider range of option)
- Herbs: basil leaves, rosemary, chives, scallions
- Edible flowers: daylilies, ginger, herb flowers (oregano, ginger, pineapply sage)
- black olives
- green olives
- mushrooms
- red tomatoes
- yellow bell peppers
- poppy seeds
- red/purple onion
Optional Lemon Water Dip for herbs (water plus few drops of lemon)
Instructions
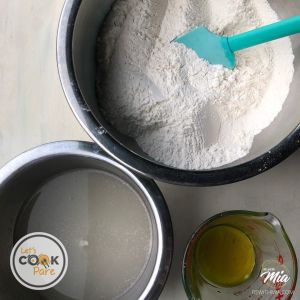
Dough Prep & Ferment
- Bowl 1: Mix water, yeast and honey. Let it form bubbles for 10-15 minutes.

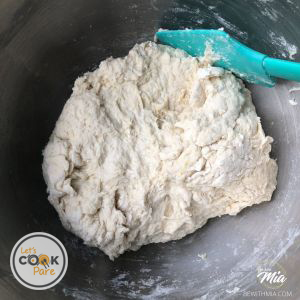
- Bowl 2: Mix flour and salt together using your hand or a rubber spatula.
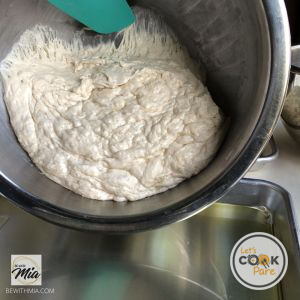
- Then add mixture from bowl 1 (yeast mixture) and olive oil. Stir until all ingredients are just incorporated. Scrape the sides of the bowl.
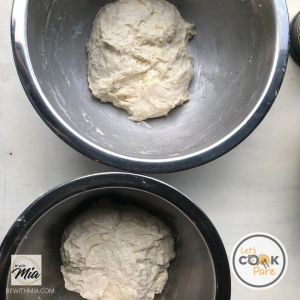
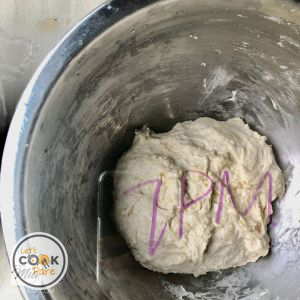
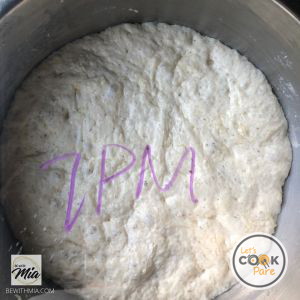
- Cut the dough in half (I just eyeball it). Put the other half in the other bowl. Coat each dough with a tablespoon of olive oil. Cover the bowl with plastic wrap and leave to ferment in room temp (21-23C | 70-75F).Adjust fermentation time depending on the room temperature and anticipated bake time.
Fermentation Cook Notes
- 12-14 hours fermentation if room temp is between 70-75 F or 21-23 C6-8 hours if room is warmer than 23 C18-24 hours if in the fridge + 2-4 hours to bring it to room temp
- Visual Key is that the dough doubles in size
Prepare your Design for the two focaccia doughs
DOUGH THE NEXT DAY (AFTER 12-14 HOURS)
- Spread 1 tablespoon evenly on the rimmed baking sheets.Note: If using ceramic, add parchment paper then brush the paper with olive oil.
- Gently tip the bowl onto the baking sheet. Use a rubber spatula or hand to encourage release of dough. Careful not to break the bubbles.
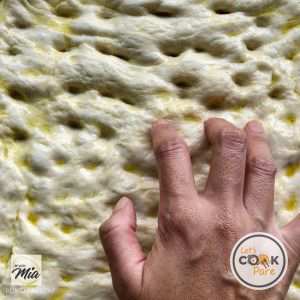
- Gently spread the dough across. Stretch the dough by putting your hand underneath the dough and gently pulling it towards the edge edge of the sheet.The dough will shrink. Don’t force the stretching. Do this in intervals of 15 minutes. So you will do this two more times before decorating, a total of 3 stretches.
The Brine
- Dimple the dough by pressing the pads of your fingers at an angle.
- Make the brine by stirring together salt and water until salt is dissolved.
- Split brine in two then pour over each dough.
Proof and Decorate (30-40 minutes)
- Carefully place the veggies according to your design. When you are happy with your design, go back and press it down with toothpick or tweezers or toll that works for you. Press down or it will pop out during the bake.
Bake
- Last 30 minutes before the bake, set oven to 450 F. On the mid-rack, place a pizza stone or another sheet pan upside down as substitute. This makes the bottom crust crisp.
- Bake for 10 minutes on top of the upside down sheet at 450F.Then at the last 12-15 minutes, lower heat to 375F.
- Remove from oven and brush with 2-3 tablespoons of olive oil. Let cool for 5 minutes then release focaccia from pan.

Serve
- Serve immediately while warm or at room temperature.